How can we improve the Image tool in Figma? (Concept)
The concept of an improved Image tool. (The article contains a lot of animated GIFs!)

Hello everyone! I want to show what you can add to the Image tool in Figma to make it more flexible and functional.
This article is not a guide or a tutorial for designers. It is the concept of an improved Image tool which I hope will appear in Figma, sooner or later.
The article consists mainly of animated GIFs.
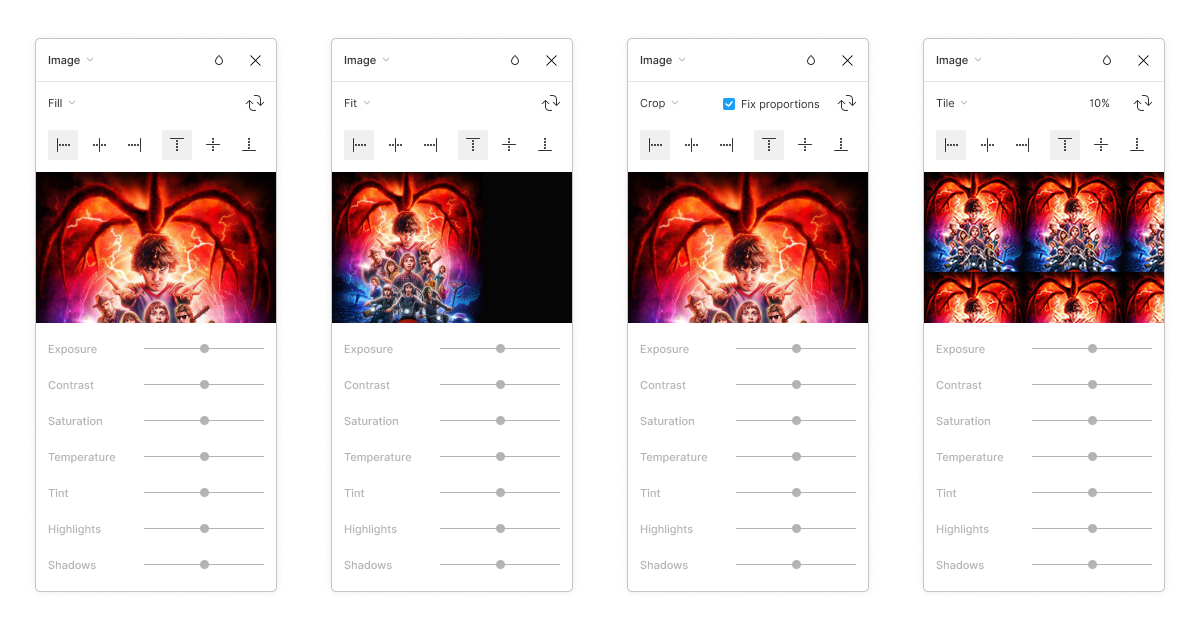
There is an Image window in the right part of the animation which shows the image settings.
There is a test frame on the left that demonstrates how these settings affect the image when changing.
What’s new?
I have redesigned the Image window, changed the size of the elements, their location, and removed the 100% field where its value cannot be changed. I have also changed the image rotation icon and, most significantly, added the ability to align the image inside the container.
The preview of the image in the Image window now shows how the image inside the container will be aligned.
Next I will tell about it in more detail.
P.S. Talking about the container, I do not mean a frame or group. A container is a shape / object which image is the content (filling).

Fill mode
If we choose the Fill mode in the image settings, then no matter how we zoom out the container with the image, it will always occupy the entire width and height of the container. But the problem is when resizing, Figma automatically centers the image in the container. And if the proportions of the image are different from the proportions of the container, the top and bottom or the right and left side of the image are cropped, thereby possibly hiding an important part of the image.
It would be much better if we could choose which part of the image will be hidden when resizing.
Through the examples below, I will show how different types of alignment work in the improved version of the Image tool.


Fit mode
If we zoom out the image in the Fit mode, the image in the container is not cropped as in the Fill mode, but always displayed full size. Even if the proportions of the container do not align with the proportions of the image.
Empty space will appear in the container, but the image will still keep its proportions and will be displayed full size.
But again, Figma always centers the image in the container. And it would be nice if we could choose the alignment depending on our needs.
Let’s see how it might work:


Crop mode
There are some cases when we need to crop part of the image without using any other graphic editors. We can do it in the Crop mode. Everything seems to be convenient and fast, but when we need to change the size of the image container, some problems arise, the picture zooms out, breaking its proportions.
In this case, after each resizing, you have to choose another mode to reset the settings and then again select the Crop mode and re-adjust the position of the image.
For these reasons, I have made a checkbox called Fix proportions so that you can block the proportion changing, after you have set up everything.
If the Fix proportions checkbox is not turned on, the image will zoom out breaking its proportions when the container is resized (like the Scale mode)

If you turn on the Fix proportions checkbox, alignment buttons appear. In this case, the Crop mode works almost in the same way as the Fill mode.

Tile mode
In the Tile mode, I have also added the ability to align the image inside the container. At the moment, Figma aligns the image top and left in the container by default.
But it would be nice here to have possibility to align the image as we need.
Let’s see examples of how it might work:


Conclusion
I am sure such functions would be very useful, especially when you have clear technical requirements for creating graphic content on the site.
For example:
Technical requirements state that the main object in the photo should always be placed on the left. When the image is reduced in width, the right side of the photo is cropped, without cropping the left side where the main object is located.
Personally, I often lack these functions and I would like to see them in Figma. What do you think?
Thank you for reading to the end.
Subscribe if you want. I still have a lot of ideas about functions and tools that I want to share.
Illustrations by Kyle Lambert

