Lightning Decision Jam: A Workshop to Solve Any Problem
An exercise to solve any problem, with any amount of people
Let me just get this out of the way for those who skim articles like I do: This is a workshop exercise that you can use for ALMOST ANYTHING involving getting a few people in a room to define and solve challenges.
What kinds of things? How many people? ANYTHING. ANY AMOUNT. We’ve run this exercise to help the UN World Food Program to make decisions on how to increase donations, we’ve run it for C-Level executives at Lego on new strategic initiatives, we’ve run it on ourselves at AJ&Smart to come up with new ways to engage our clients. It’s just an insanely flexible combination of exercises, taking the best of the world’s problem-solving processes (Design Thinking/Gamestorming/Design Sprints/Agile to name a few) and crushing them down to their absolute essence.
When I first wrote about this exercise back in early 2017 I had no idea that it would explode like it did, that companies all over the world that I love and respect would completely change what they thought about meetings and gain energy from killing all the waste that happens when discussions are open and endless.
Don’t feel like reading the whole thing? Check out this video walkthrough and use the article as a reference later! Or download the LDJ booklet FOR FREE here.
WHY LDJ?
Creative problem solving and clear decision-making is what separates good designers and managers from the best. The problem with anything that requires creative & critical thinking however, is that it’s easy to get lost, lose focus and fall into the trap of having useless, open-ended, unstructured discussions. Projects stall, teams lose momentum, and everything goes over-budget, causing many products and services to be released late and full of compromises, all because the team is so fatigued from working on endless, unprioritized problems.
The solution:
Replace all open, unstructured discussion with clear process.
At first this might feel weird, but the only way you’re going to see the results of this is to try it for yourself. The freedom to discuss might seem conducive to creativity, or more informed decision-making, when it’s in fact the enemy. Structure and discipline create the freedom needed to be creative.
HOW TO RUN AN LDJ SESSION YOURSELF
What to use this exercise for:
Anything which requires a group of people to make decisions, solve problems or discuss challenges. It’s always good to frame an LDJ session with a broad topic, here are some examples:
- The conversion flow of our checkout
- Our internal design process
- Improving our office environment
- How we organise events
- Keeping up with our competition
- Improving sales flow
-Tactics for the next sales push
Supplies you’ll need:
- Rectangular sticky-notes, we like yellow
- Square sticky-notes (2 different colours, we like pink and blue)
- Sticky dots, 2 different colours
- Sharpies or whiteboard markers (has to be fat marker, so that participants are forced to write short notes)
- A Time Timer
- A nice playlist of focus music, this is the one we use at AJ&Smart, feel free use it! (AJ&Smart Workshops on Spotify)
Ideal group size
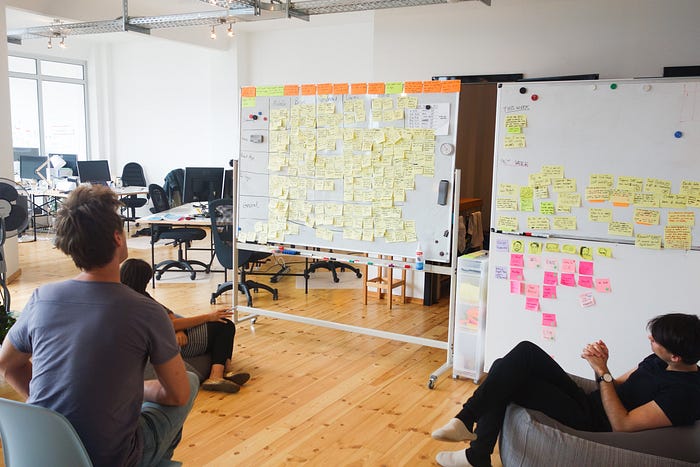
To make this exercise worthwhile you’ll need a range of input and opinions, but you don’t want so many people that the logistics of running the exercise gets difficult. You can technically use the LDJ with just 2 people, although we usually recommend a minimum of 3. An ideal size is 4 to 6 people, and the maximum is 8 (more than this and the whiteboard gets crowded and the sticky-notes become hard to keep track of). As mentioned earlier, you can run an LDJ session with as many people as you like, but you’ll still need to split them into smaller groups.
Total time needed
The times we’ve suggested in the exercise are more of a guideline and may only be relevant to the first time you run through it. The exercise itself usually takes between 30–45 mins. For larger groups (or tackling multiple problems) all the steps can take up to 1.5 hours.

Choose a moderator
You absolutely need to select someone on the team to take the role of the moderator. They can join in on the process but they must focus on making sure discussions don’t break out and they need to keep the time. We rotate this role at AJ&Smart.
Steps
1. Start with things that are working
2. Capture all the problems
3. Prioritize problems
4. Reframe the problems as standardized challenges
5. Ideate without discussion
6. Prioritise solutions
7. Decide what to execute on
8. Make solutions actionable
STEP 1: Start with things that are working
10 mins
Materials: Square sticky-notes (pick a colour) and markers
Start by drawing a sailboat on a whiteboard. It needs to have water line half way down, a billowing sail, and an anchor that hangs down below the water. The top half (the wind in the sail) represents things that are moving us forward or working well, and the bottom half (the anchor) represents things that are holding us back or not going well. Make sure there’s enough space for a good number of sticky-notes in each half.
The first step is for everybody in the team to sit at a table and (without discussion) spend 4 minutes writing all the things that are working well with the topic. These can really be anything from “we all get along well as a team” to “the quality of our designs lately has been really high”. Really anything that people are happy about and want to continue. People should write one problem per sticky-note, and once the 4 minutes are up, each person will have a pile of sticky-notes in front of them.
Encourage the team to try and write as many as possible. The moderator now selects one person at a time to stand up at the sailboat and very quickly explain each sticky-note as they stick them in the top half. Nobody else in the team is allowed to speak here unless they don’t understand something on a sticky-note. The moderator should give no more than 1 or 2 minutes per person. Make sure to not spark any discussion. Only allow questions to clarify the content of a sticky-note.
You won’t actually end up using these sticky-notes going forward, but it’s really important to start with the positives for two reasons:
1. Thinking about the positive things first makes it easier to find corresponding negatives/problems in the next step.
2. If the group starts with negatives immediately, the atmosphere can quickly turn to criticism and complaining, instead of problem solving.
STEP 2: Capture all the problems
5 mins
Materials: Square sticky-notes (same colour) and markers
Now the team spends 4 minutes writing all the challenges, annoyances, mistakes or concerns with the topic. Again in silence, without any discussion. These can really be anything from “I don’t feel like we’re making progress” to “I feel like project X is getting more attention than my project”. Really anything that is bugging us. Encourage the team to try and write down as many problems as possible. Our experiences shows that the most important problems arise quickly.
This time the team does not read out their sticky-notes. Instead, when the 4 minutes is up, the moderator tells everyone to stand up at the same time and put all their sticky-notes in the bottom half of the sailboat. This should take about 1 minute.
The reason this is done without explanation is to avoid any personal criticisms. Let the sticky-notes speak for themselves.
STEP 3: Prioritize problems
3 mins
Materials: Sticky-dots
The moderator gives each member 3 sticky dots — Everybody must now vote on the challenges they consider to be the most pertinent to solve, without discussion. People can vote on their own sticky-notes and can put more than one dot on one challenge if they feel strongly about it. They should not use dots on the positive sticky-notes, only the problems.
Once the 3 minutes is up, the moderator quickly takes the voted problems and arranges them in order of priority.
STEP 4: Reframe problems as standardised challenges
3 mins
Materials: Rectangular sticky-notes and markers
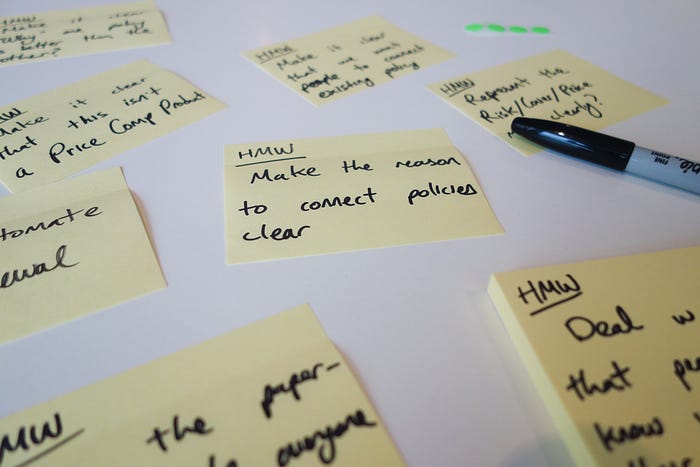
Now, the moderator is going to rewrite the top-voted problem in the form of a standardised challenge. This will help us create an array of solutions and be a little bit more broad at the start.
Let’s look at an example: The top voted sticky-note here says “I have no idea what’s happening on project x”. Because many people have voted on it, we can see it’s clearly an issue many people are having. Rephrasing the sticky-note in a “How Might We” (HMW) format allows us to make it solvable and standardise the way the challenges are written. Here’s how that problem might be re-written into a more general challenge:
Optional Step:
If you’d like to try to solve more than one problem, repeat step 4 for each problem you’d like to solve, rewriting each sticky-note as a HMW. Then continue with steps 5–8, identifying solutions for multiple problems at the same time. Any problems you decide not to solve now, can go into a problem backlog and can be picked up from step 4 another day.
STEP 5: Ideate without discussions
6 mins
Materials: Square sticky-notes (the other colour) and markers
Now each team member is given 5 minutes to write multiple solutions (1 per sticky-note) for the HMW, in silence, without any discussion. Removing discussion here also ensures a variety of solutions. It’s important for the moderator to tell the team members here that we’re aiming for quantity over quality — Later we can curate. Solutions don’t have to be written in any particular way — but they must be understandable to people reading. There is no individual presenting of solutions as this creates a bias towards the best presenters.
Once the 5 minutes is up everybody sticks their ideas on the surface (wall, whiteboard, whatever) as fast as possible, no need to be neat — just stick them anywhere. This should only require 1 minute.
STEP 6: Prioritise solutions
5 mins
Materials: Sticky-dots and rectangular sticky-notes
First, another round of voting. The moderator now gives each team member 6 dots and 4 minutes to vote on the solutions they think would best solve the HMW.
Just like we did with the problems, the moderator now makes a prioritised list of solutions — Ignore anything with just one vote. You will now have something that looks like this:
STEP 7: Decide what to execute on
10 mins
Materials: Whiteboard (or surface to draw the Effort/Impact Scale) and markers
Now that you have a list of solutions that should solve the most important problem/s, it’s important to know how much effort is required to execute the solutions so you can really decide which ones can be tried quickly and which ones might take more time to implement. Here we use a simple effort/impact scale to determine which solutions are simple enough to try right away, which are more effort and should be added to a project backlog, and which perhaps shouldn’t be addressed at all.
The moderator needs to be very proactive at this step, as it is the only one that has a tendency to open up discussion. The moderator will now take each solution one by one and add them to the effort/impact scale. “Effort” is how much time and energy we think it will take to implement, and “impact” is the degree to which we think it would solve our problem.
So here’s what moderator needs to do:
1. Draw the Effort/Impact scale;
2. Start with Impact:
a. Take the top voted solution sticky-note
b. Hover it over the center of the Effort/Impact scale
c. and simply ask “is the impact higher or lower?”
3. The moderator should then move the sticky-note up or down the Impact axis until the team members stop saying higher or lower. Often some small discussions break out here, so the moderator has to be diligent in finding a consensus and stopping any conversations extending past 20 seconds
4. Once the impact has been determined, the moderator uses the same method for effort: saying “is the effort higher or lower.”
5. This time the moderator moves the sticky-note left or right, until the group stops saying higher or lower
6. Repeat the process for the other top-voted solutions
Once the top voted sticky-notes have been added to the scale, you’ll have something that looks like this:
Now you have a clear overview of which high-impact solutions could be executed on and tested very quickly (In the yellow sweet-spot on the top left), and which high-impact solutions will take more effort (top right). The moderator should now quickly mark all sticky-notes in the sweet-spot with a contrasting dot so we can identify them later.
When we were at the LEGO office running a series of these LDJ workshops, we saw that they were using a simple way of categorising each of the four quadrants. They use these definitions to decide how and when to action all those top ideas:
STEP 8: Make solutions actionable
5 mins
The moderator now takes the “sweet-spot” solutions from the Effort/Impact scale asks the team and to come up with 3 actionable steps toward testing the solution. The person who wrote the solution can start with a suggestion. A good guiding principle is that the action steps to test out the idea should be able to be completed in a timeframe of 1–2 weeks.
Remember, these actions steps shouldn’t outline the entire solution. Only a small version of an initial test to validate if the idea will work.
Don’t overthink it. The first step should be the most frictionless step, which could be done immediately. This also motivates people to just get started.
Don’t get discouraged if the solution doesn’t work after a couple of weeks. Not all solutions will solve the problems. This exercise is made to get the team used to solving problems and trying out approaches without overthinking or over-discussing.
Let’s look at one example:
Once all these solutions are written up, your team now has actionable tasks that can be committed to. As for the solutions that didn’t make it in to the “sweet-spot”, you can put all the higher effort solutions (from the top-right quadrant) into your backlog so they don’t get forgotten. What you might see happening is that the sweet-spot actions actually end up solving problems in a way that the higher effort solutions become obsolete!
CONCLUSION: Structure and discipline create freedom
That’s it! In a short amount of time, your team has been able to define important challenges, identify possible solutions and prioritise what to execute on almost entirely without discussion!
We use this principle of eliminating open discussion in almost everything we do at AJ&Smart. From designing new product features to planning events or improving our office space.
As we mentioned before, creative problem solving is the core of design. So give it the respect it deserves and cut out the wasteful, demoralising, fatigue-inducing discussion.
Let me know in the comments if you’ve tried running an LDJ — I’d love to hear how it went! We also prepared a FREE booklet and slide deck on LDJ, grab your copy here.
Want to find out when I publish videos and articles like this? Get my bi-weekly product design & innovation digest and follow us on Instagram!