Mobile UX Design: The Right Ways to Ask Users for Permissions
by Nick Babich
Did you know that the average app loses 80% of its daily active users within the first 3 days post-install? Most people download an app, open it once, and delete it. This happens because users try out a lot of apps but decide which ones they want to delete within the first few days.
Are these user behaviors a result of poorly made apps? Not always, but the first interaction with the app plays a key role in creating overall impression (either good or bad). And when users open a new app the last thing they want to see is multiple popups in a row asking for permissions:
- App Would Like to Access Your Locations
- App Would Like Access Your Contacts
- App Would Like to Access Your Camera
Such behavior has a very negative impact on user experience and usually leads to the app being removed from user device. The app needs to create a bond with a user before asking for permissions. In this article will get you on the right track by helping you avoid common pitfalls in your permission request logic.
Build a Strategy
When it comes to requesting permission, the worst thing an app can do is to bombard users with permission requests without any explanation. Both asking your users for permission too early or for too many things at once are common mistakes. And yet, many apps still do that — right up front, as the first thing the user sees when opening the app. For example, Inbox by Gmail asks for permissions even before its onboarding tour, with no additional information.

When you send permission requests, you expect all users to accept the request. To maximize the chance for that, your should build a permissions strategy. Permission strategy is all about clarity and importance of the permission type you are requesting.

When to Ask The User
One of the biggest factors that determines whether users accept or deny your requests is when they occur.
A simple rule:
Don’t ask a user for something until you really need it.
Ask up-front only for critical permissions
Critical permissions (app cannot work without those permissions) should be requested up-front, while secondary permissions may be requested in-context. For example, if an app needs access to sending and receiving SMS to operate, declining access to the service makes the app useless. It’s evident for most users that a messaging app will request SMS permissions, so requesting it up-front makes sense.

Takeaway: Make sure the user clearly understands what the app does (based on app’s description or previous familiar experience) and ask up-front only critical permissions which user expect the app to request.
Ask for permissions in-context
When a new user experience begins with a set of permissions requests, you may be missing an opportunity to engage users. Apps that ask for permissions in context and communicate the value of proving access have much better chance to get the permission request accepted. Once users understand the context, they more likely to accept the requests.
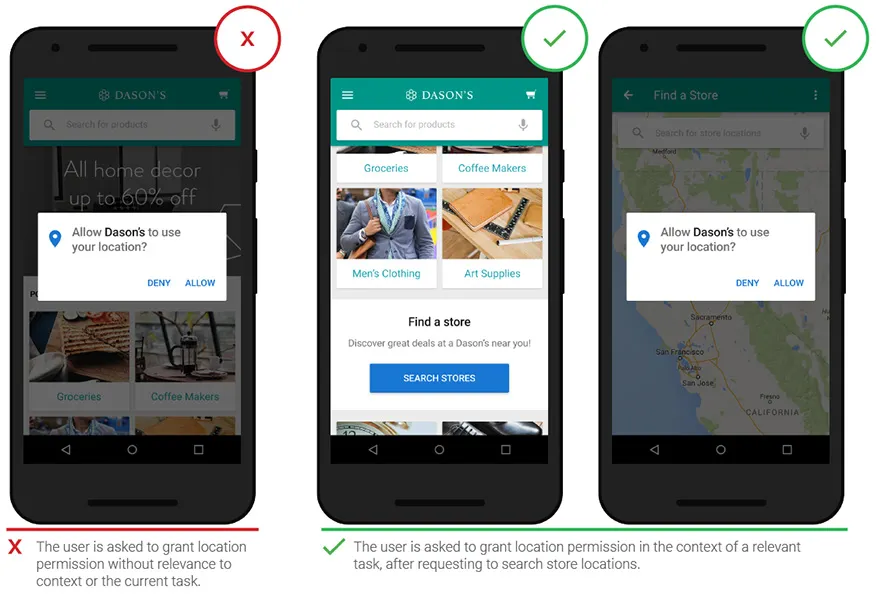
Takeaway: Users are more likely to grant permission if asked during a relevant task.
How to ask the user
A simple rule to follow:
Focus on value. Ensure that it is crystal clear for users what they will get in return for accepting the request.
Explain value
Educate users about what the permission involves and what value they will have. Strive to explain a permission request in context of user activity—focus on the value and benefits they’ll receive by giving the app access.

Show “primer” message before actual permission request
You can only trigger iOS default permission request once per feature. The worst thing is when a user denies permission at the system level—reversing that decision requires a few extra steps in iOS. Thus, in most cases, it’s better to “prime” (create context by providing essential information about the request) your users to accept requests before the actual iOS permission request screen appears.
Cluster is a good example of priming before the request. Cluster’s flow includes a context-building screen, a primer, and then finally the permission request. Using pre-permissions dialogs made the “Don’t Allow” problem for Cluster almost disappear.
Ask in context of action
User-triggered dialog works even better that context-building screen, because users expect the request and more likely to allow a permission when they want to use the feature. Wait until a feature is invoked to request permission. When the user taps a feature like the camera in Cluster app, that triggers the request for photo permissions.
How to deal with denied permissions
When users deny permissions it may prevent a feature in your app from working as intended. When users don’t have any information about that they might wonder why the app doesn’t allow them to do something. Thus, whenever a permission is denied it should be explained to the user.
A simple rule to follow:
The app should provide feedback whenever a critical permission is denied.
Help users who denied critical permissions
If a user denied critical permissions and your app cannot function properly, you need to explain why that permission must be allowed and offer a shortcut to open Settings so the user can do it. Below is an example of the Google Hangouts screen that explains that permission is needed for an app to function.

Thank you!
Originally published at babich.biz